
Painting cabinets is a pretty tempting DIY project. It’s a bit of an investment to hire a painting company to refinish your cabinets – not as much as a full kitchen remodel or replacing your cabinets altogether, of course, but still. And after all, painting doesn’t seem that complex.
Yet there is much more to the art of painting cabinets than most homeowners realize. How do the pros do it?
I remember looking at my hideous old cabinets and thinking, “I should just paint those! I’ve got time, how hard can it be?” I was pretty handy and would try household projects all the time . . . no plumbing or electrical, of course, but certainly painting or light carpentry. With plenty of time and limited funds, I was the classic DIY candidate.

If this is you, you’ve probably read every how-to article on painting cabinets that you can find. Most give you some basic pointers geared to the non-professional, the homeowner on a budget. Maybe you’ve heard tips like these: Wash your cabinets first. Protect your floors. Get a 6″ roller for the big flat surfaces, and an angled sash brush for the corners and edges. Sand between coats.
But these articles don’t show you what the professionals do when they’re painting cabinets! And the process is very different. If you’re curious to see how the pros do it, we show you here. We’ll show your our professional process for painting cabinets step-by-step. Check out our video to see the process in action. This little video is just two minutes but it shows you all the steps, and even though we filmed it seven years ago, it’s still accurate. And keep reading below to see what we do behind-the-scenes, step by step.
Why don’t DIY-painted cabinets look as good as a professional cabinet finish?
Let’s talk about why most DIY-ers only get a mediocre result at best, when they paint their own cabinets. It comes down to tools and technique.
The 3 dead give-aways to an amateur, DIY paint job on cabinets
Most how-to’s for painting cabinets tell you to use a small smooth roller or a high-quality brush to get the smoothest result possible. This works well for other woodwork trim parts of the house, such as baseboards, window sills, and regular doors. Plus professional painters know all the tips and tricks to level out any brush strokes, including knowing how the quality of your particular paint affects its ability to “level” (smooth down before it’s fully dry) and when to mix in leveling additives if needed. A pro painter can do a pretty good job getting a decently smooth result on a door or windowsill.
But the standard for cabinets is that they look and feel like a piece of furniture. No amount of skill will produce this result with a brush and roller.

Instead, you’re likely to end up with the three tell-tale signs that you painted your own cabinets:
– Visible brush strokes

– Visible roller marks, or roller “stipple”

– Visible damage to the wood…
…especially cracks, dings, or dents that didn’t get fixed, but just got painted over. It takes time and meticulous effort to fill, sand, and smooth these signs of wear-and-tear. Just painting them won’t make them go away!
How do the pros produce such silky-smooth cabinets?
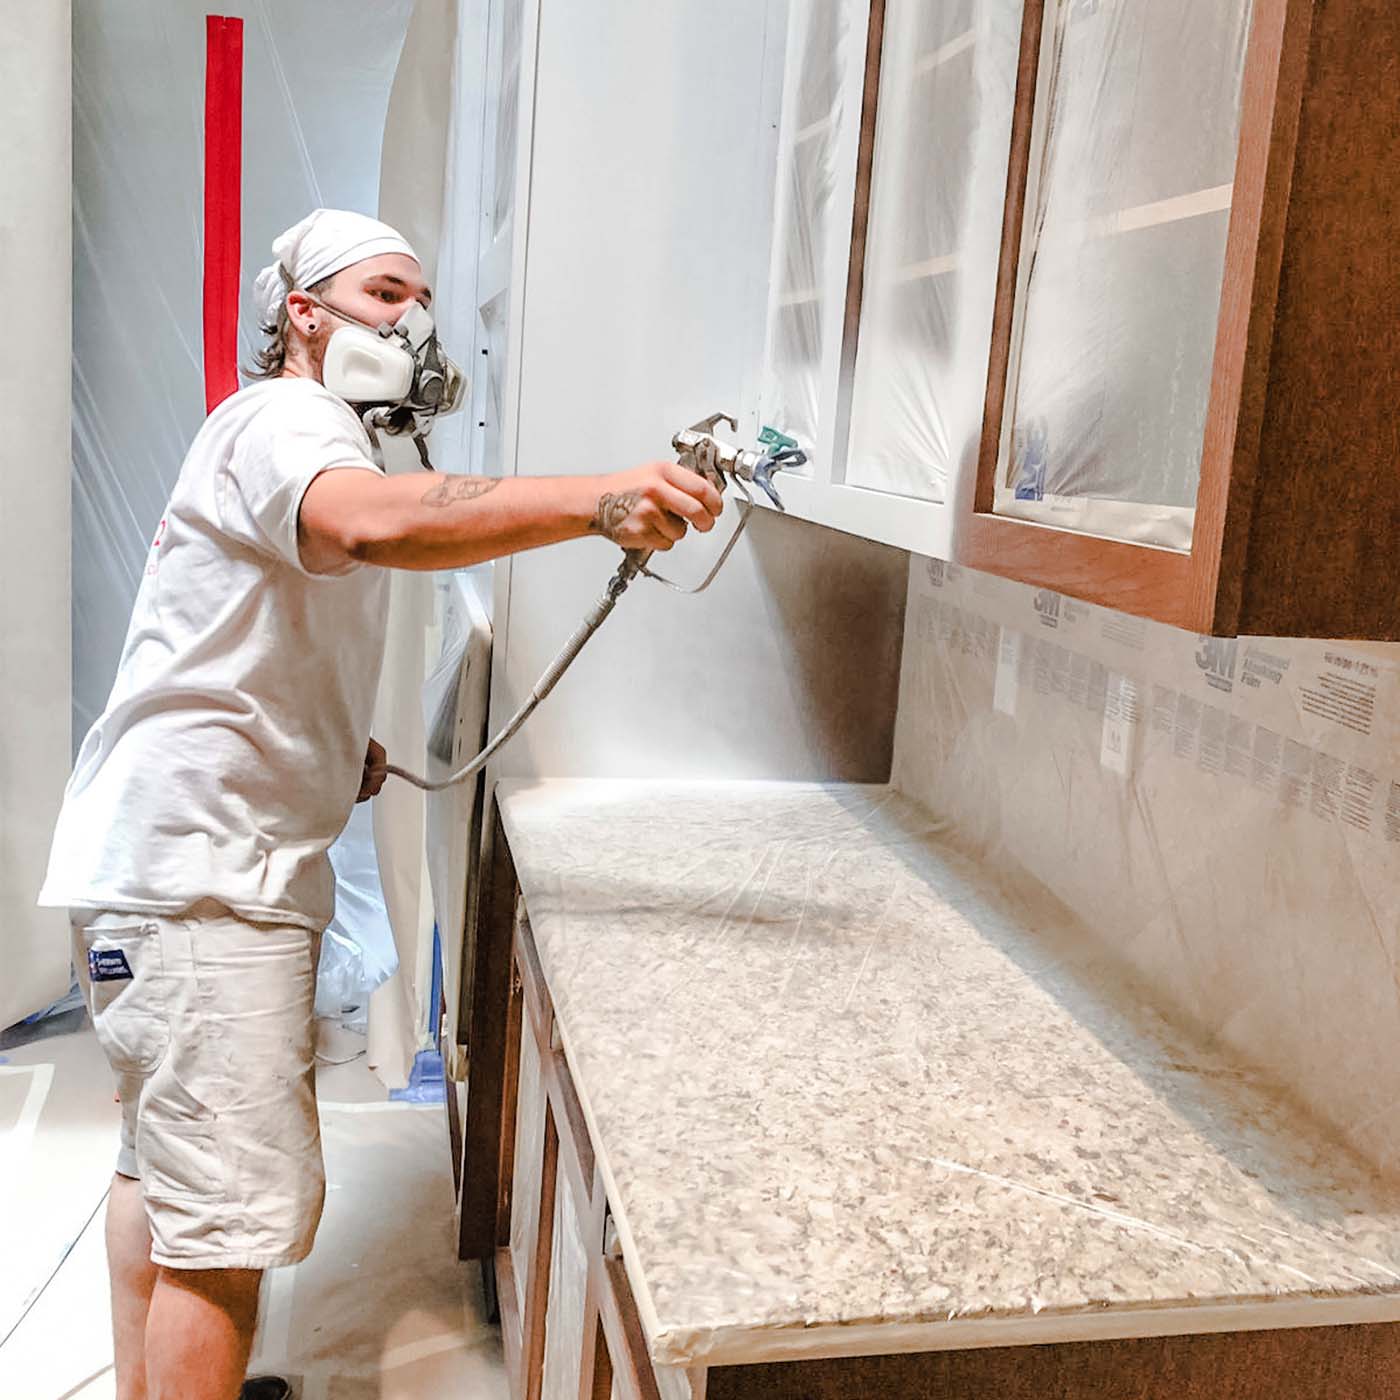
They spray them!

We at Paper Moon Painting want your kitchen to look as beautiful as you do, so we always spray our finishes, for a smooth look free of brush strokes or roller marks.
This is a big reason why painting cabinets isn’t always a great option for a DIY project. Without professional spray equipment, it’s almost impossible to get the smooth, “factory finish” look of new cabinets. It would take a determined homeowner indeed to get a pro-level sprayer and practice with its use until they’ve mastered the technique of spraying cabinets. Our own cabinet painters go through a lot of training and testing before we set them loose on a project where they’ll be painting cabinets, because we know the level of quality we’re trying to achieve.

The standard is even higher for high-gloss cabinets. The higher the sheen, the more you’ll see any brush strokes or imperfections. Spraying is the only option.

Pro cabinet painters also use products that aren’t easy for a homeowner to master over a weekend or two. We usually use professional-grade lacquer because it has a lovely, silky-smooth feel to it, and is what cabinet manufacturers use. We think it’s the best paint for cabinets, hands-down (although there are some great pro-level water-based options as well). Nothing else quite matches the gorgeous look and feel of lacquered cabinets, in any color or sheen.
But sprayed finishes, and especially lacquers, can be tricky to master. The wrong pressure or setting on your spray gun, or the wrong distance you’ve got the spray tip from the surface, or the wrong speed that you’re moving your arm . . . All these things can cause paint to sag, drip, or go on so thin it doesn’t cover well or last long. Professional cabinet painters know how to get a smooth, even coat each time, so your cabinets don’t look like an amateur did them over the weekend.

When painting cabinets, our professional painters follow these steps:
We disassemble your kitchen by removing the cabinet doors and drawer fronts.
We remove all the hardware such as drawer pulls and door handles. Then we remove the cabinet doors and take off the hinges. We keep track of each individual door hinge, so we can put them back in the right place when we reassemble.

– What about the insides? Do I have to empty out my cabinets first?
It depends. There are two possible scenarios.
Are the insides of your kitchen or bath cabinets in a light wood with a clear topcoat, or are they painted a solid color, or possibly stained dark? If they have a clear topcoat, as in the kitchen photo above, those are usually left as-is. (Most newer cabinets come this way.) In that case, we’ll paint the outside but not the insides of your cabinets. This means you can leave dishes and such in there, because we’ll cover them with plastic to protect them from getting sprayed. Less work for you!

However, if the insides of your cabinets are stained dark or previously painted in a solid color, then the best design choice would be to paint the cabinets inside-and-out. In that case, everything needs to come out of your cabinets and drawers before we arrive. Silver lining – this is your chance to go through the contents of your kitchen and donate what you no longer need.

Then we remove the drawer fronts, if possible. Sometimes the fronts are made to unscrew easily from the drawer “boxes”, which is the ideal scenario. We remove them and leave the boxes themselves in place (which means you can leave items like silverware inside the drawers during the whole process).

But if the drawer fronts aren’t removable, we pull out the drawers completely and mask off the drawer boxes to protect them from paint overspray.

– Do you ever leave the cabinet doors on and just paint them in place?
No! Professional painters take the doors down to paint them, and here’s why . . .
We’ll always paint both sides of your doors, both sides of your drawer front pieces, and the outsides of the cabinet bases and frames themselves (whether or not we’re painting the insides). To do this, we have to “disassemble” your kitchen, or else your cabinet hardware and hinges will get painted too. Just masking them off doesn’t cut it – the masking is never perfect, leaving a hairline edge around your hinges that either got missed, or let paint seep onto the hardware itself.
It’s a classic DIY or amateur move to leave the doors hanging in place and not have to remove all the parts and label the hinges. Or dealing with finding a place in your home to spread out all the cabinet doors so you can paint one side, then wait for them to dry enough so that you can flip them over and paint the backs . . . ad nauseam, for multiple coats. Plus trying to paint both sides of the doors and drawer fronts while they’re still in place is extremely tricky, and it’s almost impossible to get a smooth result without getting paint on your hinges or leaving brush strokes on every surface.
Professional cabinet painting doesn’t permit a lot of shortcuts. We remove the doors and drawer fronts and either use a specially-made rack to hold the doors while we’re working, or take them off-site to our cabinet spray shop for spraying. This way, you’re guaranteed a smooth, professional finish on BOTH sides of your cabinet doors.

We mask off your kitchen.
We cover everything that won’t get painted – countertops, backsplash, appliances, floors – with either masking paper or plastic. And we’ll tent off your kitchen with vapor-barrier plastic, to contain any dust or odors while we’re spraying. We put in zippered walk-through openings in the plastic “walls”, so you can still enter your kitchen when we’re not working, and access your refrigerator, sink, and pantry.
If we’re not painting the insides of your cabinets, we tape paper or plastic over the openings where your doors and drawers go, protecting the insides from any overspray.

– Is there going to be a strong smell?
Ah, here’s where we’re really proud of our process! We go the extra mile to make the whole project as comfortable for you as possible. We think the best paint for kitchen cabinets is lacquer, but if there’s a downside, it’s that lacquers are smelly while they’re being sprayed, there’s no way around it..
But we’re on it! Not only do we tent off your kitchen to contain any odors, we use heavy-duty air scrubbers with both carbon filters and HEPA filters. We vent everything out to the fresh air outside. Plus the air scrubbers clean your air on a continuous cycle within the spray area. If there’s a way to reduce any temporary smells and make the process easy for you to live with while we’re in your home, we’re doing it!

Above, you can see how we’ve tented off our work area, and the two round exhaust fans that vent to the outside. One of the kinds of air scrubbers we use:

And just because he’s so cute, here’s the homeowner’s English bulldog pup, in the tented-off part of the kitchen:

Before we can actually start painting cabinets, we do extensive “prep”.
Kitchens can get pretty beat up. Cooking grease, dust and grime accumulates over time, even with the best of housekeepers. Every surface that we’re going to paint gets cleaned, degreased, and “scuffed”. (Scuffing is a quick, light sanding to remove the top glossiness of the existing finish.) This helps the primer bond to your cabinets. If there are any light repairs needed, such as dings or deep scratches in your cabinets, we address them after priming, when they’re easier to see.

By the way, ineffective cleaning and scuffing is the single biggest reason why most DIY cabinet painting projects fail. (Well . . . that, and the visible brush strokes or roller marks you get when you don’t spray them.) Even the best paint for kitchen cabinets won’t stick to grease and grime. This step isn’t fun, and it won’t give you the thrill of progress, but it’s absolutely critical when you’re painting cabinets.
We prime everything.
Here’s where you’ll start to see a difference. Regardless of the final color chosen, your kitchen cabinets will now look white after priming. It’s always exciting seeing the transformation start to happen!

Priming usually takes two coats, with plenty of sanding and dusting in between.
– If lacquer is the best paint for kitchen cabinets, then what do you use for primer?
It depends on how grainy your cabinets are!
Different projects call for different primers. Are your cabinets made of oak or hickory, or any porous wood with a deep or heavy grain? In that case, we use a special heavy-bodied primer that is designed to fill 95% of your cabinet’s grain. Otherwise, your painted cabinets will still have the texture of the wood’s grain underneath.

Will the primer fill the grain 100%, over every square centimeter? Well, we think we use the best primer for kitchen cabinets if you want to fill grain, but it’s not a miracle product. Not every last bit of grain is always filled. But it will fill almost all of it, enough that your cabinets will look smooth and lovely, especially on the front faces of your cabinets where it matters most. (We paint our cabinet door samples on grainy oak, so that at your initial estimate, you can see and feel a real-life example of how beautiful they’ll look once we’re done.).
And if your cabinets are already smooth, such as maple cabinets? Then we use primers that are specially modified to bond to smooth surfaces.
We fix any obvious surface imperfections.
Dings, cracks, or other imperfections are easier to see after priming, so we take care of them now. Everything we’ve primed gets inspected, including the cabinet bases, and both sides of the doors and drawer fronts. We fill dings and sand out rough spots, taking extra care on the “fronts”, or visible sides of your cabinetry. And if your project estimate includes filling any existing hardware holes, we do that now too.
Some cabinets need a little more TLC than others . . .

We sand and prime again.
By the time we’ve fixed any small imperfections and sanded the primer layers, your cabinets will feel smooth as butter!

Now for the fun part. We spray the color!

Once the final color goes on, you can really start to envision how beautiful your kitchen will be. Since your cabinets are already fully prepped, primed, and sanded smooth, even laying down two coats of the final color goes surprisingly fast.
Starting to wrap up: we reassemble everything.
First we remove the plastic or paper from the door openings, as you can see in this photo where we painted the cabinets in a soft white (you saw this kitchen earlier, masked off in plastic):

Your newly-painted cabinet doors go back up, we put your drawer fronts back in place, and we reinstall your cabinet hardware (drawer pulls, door knobs, and handles). Since we had already labeled the hardware hinges earlier, this step is pretty straightforward.

We unmask your kitchen and get it all cleaned up.
At last you can see your finished kitchen. We take down all the paper and plastic, remove our equipment, and clean up the whole area. If this were an HGTV show, this would be the “big reveal”!

Here’s the kitchen from the video:

How long does painting cabinets take from start to finish?
It’s pretty amazing, but we rarely take longer than a week to transform a kitchen. In fact, if yours is a small to medium-sized kitchen, we’re usually done in 3 days.
Although there are lots of steps involved in painting cabinets, it’s a process we’ve researched and practiced over and over to get the best results. We’ve done hundreds of kitchen painting projects, and we’re very proud of our streamlined system!

Read more about our cabinet painting services, browse our gorgeous project galleries, and see some fun before-and-after projects. And because we think your cabinets are too great an investment in your home to leave to just anyone, learn how to evaluate and choose a good painting company here.
Want to see how we can transform your kitchen? Schedule a free in-home estimate where we’ll go over the process and show you our samples, for either our Austin or San Antonio locations. Painting cabinets is our specialty, and we’d love to show you how beautiful your cabinets can look!